Migrating from legacy container links
In a previous post, I wrote about how I set up a simple dockerized flask app. I haven’t had to mess with it much since then; the last time I touched it was about a year ago. A year is basically eons in Docker time, so it wasn’t a surprise when an update to Docker all but rendered my setup obsolete. Specifically, container links are now marked deprecated with a warning that the feature may eventually be removed.
Enter User-Defined Networks
User-defined networks are virtual networks that you can create. I run my containers on a single physical host (for the purposes of this blog, my Macbook),
so I’ll create a bridge network. All containers on the same bridge network can talk to each other via either IPs or container names.
Also, a container can be part of multiple bridge networks (more on this later).
My Legacy Setup
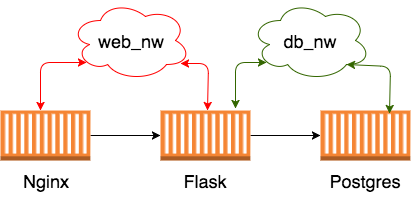
I have a standard web application setup with 3 containers - an nginx reverse proxy, a web container running flask and a DB container running Postgres.

With my earlier setup, I used container links (--link) to allow nginx to talk to the web container, and the web container to talk to the DB container. Links inject host and port information as environment variables in the container which is convenient. However, the drawback is that they’re fairly static and you can’t add/remove links without restarting the container. And of course, the fact that they’re deprecated.
Proposed Setup
For the purposes of migration, I could create a single bridge network, connect all 3 containers to this network and call it a day (recall that containers on the same bridge network can talk to each other by default). However, we don’t want the nginx container to be able to communicate with the DB container in accordance with the principle of least privilege. Not only is this a good security practice, but also forces you to think through dependencies between your application components.
To that end, we will create two separate bridge networks: web_nw to connect the nginx and flask containers, and db_nw to connect the flask and Postgres containers.
The setup is pictured below.
Getting there
For any serious production deployment of a multi-container setup like this, you’ll want to use an orchestration tool like Docker Compose. In general, my philosophy is to learn how things work under the hood before reaching for tools that do the magic for you. As such, we’ll create the setup using only the base set of docker commands.
Step 1
Create the two user-defined networks db_nw and web_nw
$ docker network create -d bridge db_nw
184cd38a1c72859d7033a66a3cf1840378a075eea2965d329fe6d69adbc1aa7f

$ docker network create -d bridge web_nw
a555ba7f5ce1a259398360c4c101276d8aa43cb1fe042596c78e9c3f7530ee7d
Verify that the networks were created:
$ docker network ls
NETWORK ID          NAME                DRIVER              SCOPE
5db3134a6ce7        bridge              bridge              local
184cd38a1c72        db_nw               bridge              local
5a7381c13554        host                host                local
83a748aba1a6        none                null                local
a555ba7f5ce1        web_nw              bridge              local
Step 2
Run the DB container connected to the db_nw bridge network
$ docker run --network db_nw -d --name db postgres:9.4
f05ee591e398322a62a45294361a4d2d6ba2df1e1bf67963c66a19c7c900f572
Step 3
Run the web (flask) container connected to both the db_nw and web_nw networks
$ docker run --network db_nw -d --name flaskapp flaskapp
0a14dbdced2af940e64958edf7f8df23f7daa2b1c9a9a944782f0224d27ac764

$ docker network connect web_nw flaskapp
Note that the docker run command takes only a single network argument, so if you want to connect a container to multiple networks you need to
use a separate docker network connect command after starting up the container.
Step 4
Run the nginx container on the web_nw network
$ docker run --network web_nw --name nginx-flask -v -d -p 8080:80 nginx-flaskBrowse to localhost:8080 and voilà you should see your app’s home page.
Note that I needed zero configuration changes in my nginx.conf. To revisit the config from my earlier post:
server {
    listen 80;

    location / {
        proxy_pass http://flaskapp:5000;
    }
}
The hostname flaskapp resolves just fine since the flaskapp container is running on the same bridge network as the nginx container.
Summary
Migrating to user-defined networks required a slight re-design and some extra work, but it makes my setup a lot more flexible and powerful. In my next post, I’ll show you how I can deploy a new version of my flask app in a separate container and dynamically reload the nginx configuration to point to the new container with zero downtime.